
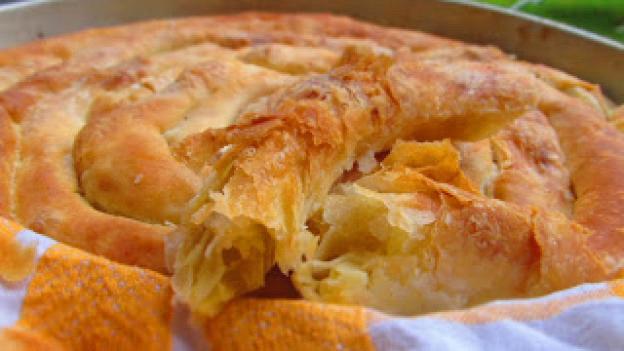
Shopska Banitsa
A large coiled Bulgarian cheese banitsa with hand-stretched pastry. The tray for this banitsa is 36 cm in diameter - quite a big coiled banitsa. If you want to make a smaller one, use for example a 150 ml cup as a measure and keep all the other products the same, except the amount of cheese for the filling!
Ingredients
| 3 1/2 чаши | flour (for the dough) |
| 1 | egg |
| 2-3 с.л. | oil |
| 1 чаша | lukewarm water |
| 1 ч.л. | salt |
| 125 гр | butter |
| 300 гр | crumbled cheese (for the filling) |
| 2 | eggs |
Instructions
Today the weather in Hunsrück was quite gloomy. This of course affected the photographs too. I don't use Photoshop or special photographic aids. I apologise for the quality of the photos!
- In a large bowl I sift only 3 cups of the flour. You can't know in advance exactly how much you'll need depending on its quality. From experience I know it's better to add flour to the dough than liquid. If you get a very stiff dough - there's no fixing it. So better a little flour added gradually than all of it and then throwing the dough away.
- First I stir with a wooden spoon until I get something like a thick porridge.
- I start adding more flour until I get a dough I can comfortably knead by hand. I add only a few pinches of flour at a time - I just dust it. If you can't stand the dough sticking to your hands, there's a solution: put on disposable rubber gloves, the finger-fitting kind, and calmly carry on kneading.
- It's good to knead the dough until smooth, adding flour very little and gradually. You don't need to use up all the flour, though. Rather you should get a soft, smooth, non-sticky dough.
- The kneading is like lifting the dough off the table with your fingers and turning it toward the middle of the ball. It's good to knead for about 10 minutes. The turning is done with the fingers. Then you press with your palm and turn again toward the middle with your fingers. The hands alternate - left, then right.
- I divide the smooth, soft, non-sticky ball into three roughly equal parts.
- I roll out each ball with a rolling pin. While possible, on a very well-floured surface, floured dough and a floured pin, I roll the sheet the ordinary way. I press lightly with the pin, turn the sheet, press again and turn again.
- When the sheet reaches a diameter of about 30 cm this method no longer helps, so I start rolling the sheet around the pin, pressing the sheet gently /very lightly/ with my hands /rather the palms/ and moving the hands /the pressure on the sheet is very light/ toward the ends of the pin. Remember! Flour the sheet and the pin very well. Otherwise the sheet may stick and you won't be able to peel it off. But even that's not a problem - reknead the "ruined" sheet into a ball and start rolling again.
- With the movement of the hands from the middle toward the ends of the pin and the winding of the sheet onto the pin, the sheet gets rolled out. In the end the whole sheet is wound on the pin. Try to make the movement with the palms and keep the pressure very light - as if massaging your baby. If you press harder the sheet may stick.
- Lift the pin together with the sheet. Turn it perpendicular to the direction you've been moving and unwind the dough onto the floured table.
- Repeat this whole "exercise" a few more times, or until the sheet seems big enough to you. Under no circumstances try to make it transparent or, as they write on the internet, thin enough to read a newspaper through. This sheet is Shopska. There's no need to read through it!
- I brush the rolled sheet with melted butter. I melt it in the microwave very briefly - just enough to spread it over the sheet. Or I just splash the sheet with a spoon.
- I fold the sheet in half and brush again with butter. I fold once more in half and again brush with butter. I set it aside at one end of the table.
- In this way I roll out the other two parts of the dough too. Remember! You don't need to try to get huge, transparent sheets. The size of the sheet doesn't matter.
- When I'm done with the three parts of the dough, I start again from the first sheet. Using the rolling pin, but very carefully, I roll it out as much as this well-buttered sheet allows. Of course I don't forget to dust the table, the sheet itself and the pin with flour. Otherwise everything will stick and I'll have to scrape it up with a spatula.
- When it's no longer possible to roll with the pin, I simply slide my hands under the sheet, without digging in my nails, and gently pull the sheet outward. This is called stretching, but you can do without it. The banitsa will turn out well enough even with a thicker sheet.
- I grease the tray generously with margarine and turn on the oven to 220 degrees to preheat. I don't use the fan for pastry.
- In a bowl I beat the eggs and crumble the cheese. I mentally divide the filling into three parts and sprinkle the first sheet with the first part.
- I divide the sheet down the middle with a pizza cutter. I roll each half of the sheet along its long side into a coil. I wind each coil into the pre-greased tray. I try not to place the coils too tightly against one another. That depends on the size of the tray, though. The banitsa will bake better in a bigger tray.
- In this way I prepare the other two sheets too.
- I put the finished banitsa in the hot oven and baking continues about 30-40 minutes at 220 degrees, or until dark golden.
- I take the hot banitsa out of the oven and sprinkle it with a little cold water. By old habit I cover it with a clean kitchen towel. But you can do without that. After all, we want it crispy too!
You can serve the Shopska banitsa both hot and cold! It's very crispy, with layers that separate and melt in your mouth!
There's nothing easier than making Bulgarian food! What matters is the desire! Let's preserve this incredibly delicious and beloved cuisine! Pass it on to your children!