
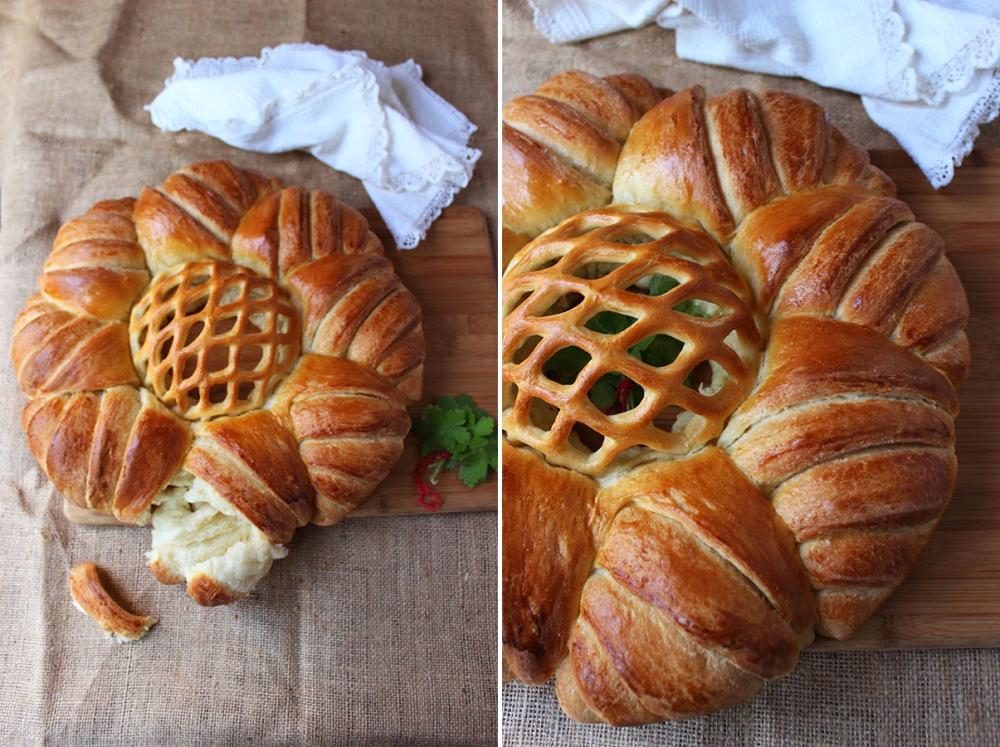
Twisted Pita with Rosette
A decorative Bulgarian festive round loaf: a twisted, layered wreath topped with a domed dough rosette shaped over a foil-and-paper form. The enriched dough is made in the bread maker on the Dough program.
Ingredients
| 100 ml | Warm water | |
| 4 tbsp | 60 ml | Sugar |
| 40 g | Fresh yeast | |
| 200 ml | Warmed fresh milk | |
| 60 ml | Olive oil | |
| 2 | Large eggs + 1 egg white, lightly beaten | |
| 2 tsp | 10 ml | Salt |
| 825 g | Flour, plus extra for kneading if needed | |
| 60 g | Melted butter, for brushing | |
| 1 | Egg yolk + 2 tbsp fresh milk + 1 tbsp oil, beaten — for the glaze | |
| — | Baking spray, or preferred fat | |
| — | Dough roller — for shaping the rosette "mesh" |
Instructions
Required products: 100 ml warm water 4 tbsp sugar 40 g fresh yeast 200 ml warmed fresh milk 60 ml olive oil 2 large eggs + 1 egg white, lightly beaten 2 tsp salt 800–850 g flour, plus extra for kneading — if needed 60 g melted butter, for brushing 1 egg yolk + 2 tbsp fresh milk and 1 tbsp oil, beaten — for the glaze baking spray, or preferred fat dough roller — for shaping the "mesh" of the rosette
Method: I borrowed the idea of "twisting" the loaf from Dianka — a very gentle, easy and striking way to shape bread, in my opinion :) Heartfelt thanks for sharing the idea, Di!! I borrowed the idea for the rosette from Sandra Mangas — I remember falling in love with her suggestion years ago :) and I promised myself this wouldn't be the first and last incarnation of her idea... Sandra showed clearly how to shape the spherical mesh — I'll just add that I first formed the ball on which I placed the dough for the mesh out of aluminium foil — so it would be firmer and not give way as the wreath dough rose — then I wrapped it with several layers of baking paper — until I achieved a perfect spherical dome about 15–20 cm in diameter with a flat bottom — and finally sprayed it with baking spray, for easier release of the dough after baking. And now for the shaping of the loaf itself... In the bread maker container mix the liquid products and the crumbled fresh yeast and turn on the bread maker on the "dough" program (with the lid closed). Sift the flour with the salt, and add it in parts to the liquids, waiting after each addition for it to be absorbed — until you get a smooth, firm dough that pulls away from the walls and bottom of the container on its own. Wait for the end of the program and heat the oven to 50°C or 40°C with fan. Line the bottom of a large tin (I'll specify the size of mine this evening, but it's about 40 cm from memory) with baking paper, grease the bottom and walls with baking spray and set aside. Tip the finished dough onto a floured work surface and knead another 4–5 minutes, adding (if needed) a little more flour. Divide into 6 equal parts and set aside 1 part for the rosette. Roll out the 1st of the remaining 5 parts into a round about 25 cm in diameter, place it on the bottom of the prepared tin and brush with melted butter. Repeat with the remaining 4 parts of dough, placing each next round on top of the previous one. Cut into 8 equal parts, leaving an uncut border about 2–3 cm at the edge. Carefully separate — one by one — each of the resulting 8 triangles and fold the layers fan-wise — shifting and overlapping — one after another around the border, tucking their ends under the dough. Roll out the round set aside for the rosette and, using the dough roller, shape the rhomboid mesh. Carefully place the already-cut dough onto the previously prepared and greased paper dome, helping the slits in the mesh open evenly, and trim off the excess dough at the base, leaving a small margin (about 1 cm) to tuck under the wreath. Place the paper dome, now draped with the cut dough, in the centre of the tin — having taken care that the diameter of the dome matches the diameter of the centre of the wreath — and gently tuck the edges of the mesh dough under the wreath dough — leaving a large enough opening through which you'll later remove the paper ball from the finished loaf. *** From the trimmed dough you can additionally cut out little leaves, flowers, butterflies, or create some braids to place at the base around the rosette, but even without extra details the loaf is striking enough ;) (well, I'm modest too?!) Brush the loaf again with fat and leave in the oven preheated to 50°C or 40°C with fan for about 20 minutes — to rise. Take out the risen pita and switch the oven to 180°C or 160°C with fan, meanwhile brushing the pita with the yolk beaten with fresh milk and oil (optionally — you can also sprinkle with seeds). Bake in an oven preheated to 180°C or 160°C with fan for about 35–40 minutes — after the 15th minute cover the rosette with a cut circle of aluminium foil (I used a small bowl to form something like a foil dome exactly the diameter of the rosette), so it doesn't scorch. If needed — at the end of baking cover the whole pita with foil, so the wreath doesn't scorch either. After baking, take out of the oven and leave on a rack until the tin cools a little.
If the tin is rectangular and shallow or has a removable side :) getting the pita out is not a problem, but despite the large diameter of the tin I chose, my pita filled it — and I had to remove it from the tin with acrobatic skills I didn't suspect I had and a solid dose of luck!!! I covered the tin with the foil I used to protect the pita from scorching and carefully turned it over along the length of my arm — the way you cradle a small baby — trying to keep the rosette in the light crook of my elbow — quickly removed the tin, placed a wide enough kitchen board on top and successfully flipped the pita onto the board. We slide a second kitchen board in parallel with the first and move the two boards apart wedge-wise from each other — so that the centre of the pita stays in the triangular gap in the middle — and here it's good to have someone else help too, because one pair of hands is decidedly not enough. Gently carry the pita, as it is on the boards, off the work surface — so that the triangular gap between the two boards is accessible — and while someone obligingly holds the pita with the boards (so it doesn't fall off the counter), carefully remove the paper ball from under the rosette, gently squeezing the paper to reduce its volume so it comes out more easily, while taking care not to spoil the rosette. It sounds long and complicated, but actually it goes quickly, and the pita isn't so fragile that it falls apart from nothing. You can serve it with a lit tea candle under the rosette or with fresh flowers :)
From http://angellovescooking.blogspot.bg/2014/06/rosette-round-loaf-bread.html