Sugar Glass (Hard Candy Jewels / Sea Glass Candy)
How to make hard candy jewels and sea glass candy from just sugar, corn syrup and water boiled to 300°F, colored and flavored, then shattered or molded into glass-like gems.
Ingredients
| 1 3/4 cup | 420 ml | granulated sugar |
| 1/2 cup | 120 ml | corn syrup |
| 1/2 cup | 120 ml | water |
| 1-2 drops | food coloring (blues and greens work well) | |
| 1/4 tsp | 1.3 ml | candy flavoring or food grade flavor oil |
| 1 cup | 240 ml | powdered sugar for coating |
Instructions
Rock Candy (basic version): 2 cups water, 1 cup white corn syrup, 3 1/2 cups sugar, 1/4 tsp cream of tartar. Then add: 1/4 tsp vanilla extract, 3 drops of blue gel food coloring. Boil the mixture and continue stirring it on the heat until it reaches 300 degrees F (use a candy thermometer to measure the temp). At that point, pour it into a tray to cool. It hardened up in about an hour and then I smashed it to pieces.
МОРСКА ВОДА / SEA WATER (Sea Glass Candy)
Ingredients: 1 3/4 cup granulated sugar, 1/2 cup corn syrup, 1/2 cup water, 1 or 2 drops food coloring (blues and greens work well), about 1/4 tsp or a few drops of candy flavoring or food grade flavor oil (tangerine used), 1 cup powdered sugar for coating.
- Lightly spray a 12 inch pizza pan.
- Put the granulated sugar, corn syrup, and water in a saucepan. Clip your candy thermometer to the side of the pan.
- Bring up to a boil, while stirring to dissolve the sugar. Once boiling, stop stirring and let it bubble away until it reaches 300F on the thermometer. As it gets close to 300F, add in the drops of food coloring, but don't stir, it will mix itself in.
- When it reaches 300F take it off the heat, stir in the flavoring oil, and immediately pour out onto your surface. It will spread out by itself. Be VERY CAREFUL, it is very hot.
- Let the candy sit until fully cooled and hardened, then lay a piece of plastic wrap lightly over the surface and rap it with a hammer to shatter the candy into pieces. Do this slowly so you can try to get the most realistic size for your pieces.
- Working in batches, put the pieces of candy into the powdered sugar and coat well. Use a dish towel to rub off the excess sugar and rub down the very sharp edges.
- Store the candy in an airtight container, or divide up into individual cellophane bags.
Notes (recipe from hp.com), tips:
- You're going to need a candy thermometer for this. You should have one anyway, they are a necessity for most types of candy making, and deep frying, too.
- Look for candy flavoring oils in the baking aisle of your supermarket. Otherwise, for a wider choice, visit a large craft store like Michael's, or go online. There are endless choices, from root beer to pina colada.
- Be very careful when working with molten sugar. It is dangerously hot and you don't want to touch it. Keep away from children and pets.
- I found that for this recipe my 12″ metal pizza pan worked perfectly. The mixture will spread too thinly if you use a very large surface.
How to make hard candy jewels (by Chica)
Jo and I have been doing lots of projects over the last month or so for Little Jo's birthday party. We found ourselves needing some round gems in just the right color of teal. If they could be edible, all the better. So I did some shopping and some research and came up with everything I needed to make hard candy jewels.
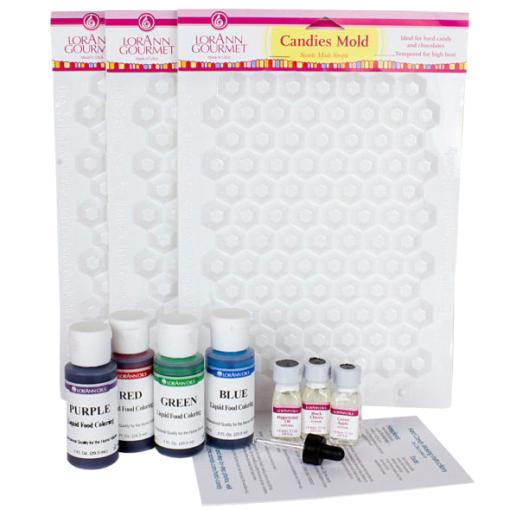
You'll need to pick up a couple of custom supplies for making hard candy. First, you'll need some very specific molds, designed for use with hard candy. Don't use chocolate molds or anything that's not made to withstand the high temperature of the sugar syrup. You will also need some liquid food coloring that's suitable for use with hard candy and optionally, some candy flavoring oils in any flavor you like. The rest of the items you'll need are quite simple: corn syrup, sugar, water, a pan, non-stick cooking spray, a candy thermometer, and a Pyrex 4-cup measuring cup.
Prep: Before turning the stove on, there's lots of prep work to do. The very first step is to calibrate your candy thermometer. Bring a pot of water to a boil and put the thermometer inside. It should read 212 degrees F (at sea level). If it's higher or lower, remember that difference and adjust your target temperature accordingly. (Example: if your thermometer says 200 when the water is boiling, you're 12 degrees too low, and you should subtract 12 from your recipe's target temperature.) Do not skip this calibration step. Once your thermometer is set, spray the hard candy molds with the non-stick cooking spray - don't be too stingy, but don't let it puddle either. Cover your work area with aluminum foil (candy won't stick to it). Put a piece of foil on the counter next to your stove and put the Pyrex measuring cup on it. Put another big piece of foil down and put your molds on top; get a clean, dry spoon ready if using flavoring.
Ingredients (jewels): 2 cups granulated white sugar, 2/3 cup light corn syrup, 3/4 cup water, food coloring as desired (I used 20 drops), 1 tsp (1 dram) of candy flavoring oil (optional).
- Mix up your ingredients in the pan. Stir together everything except the flavoring oil so it is mixed well and the color is uniform. UPDATE - adding the coloring too early can make your candy turn out sticky (the acid in the coloring inverts the sucrose), so you may want to wait and add the coloring at the last minute with the flavoring.
- Clip your candy thermometer to the pan, making sure it does not touch the bottom.
- Turn the burner on high. Do not leave this unattended. When the mixture first starts to boil, the temperature will rise to 212 really fast, with lots of steam. As it continues to boil, the temperature rises much more slowly and the steam dies down; your thermometer will suddenly be dry and easy to read.
- Let the sugar boil to 300 degrees F but not a bit more! The minute you hit 300, take the thermometer out and set it on the foil, then immediately dump the boiling sugar into the Pyrex cup (easier to pour, and it stops the cooking process). CAUTION: This sugar syrup is VERY hot - use a heat-proof cup at least 4-cup size.
- At this point add your optional flavoring oil (and coloring, if not added already) and stir it in quickly but carefully.
- Work fairly fast to pour the sugar into the molds before it hardens. It will be very easy to pour for about 5 or 6 minutes, then start to thicken; after 8 or 9 minutes it'll be too thick to pour. Pour slowly and carefully, taking care not to overfill. Small drizzles are okay, but don't leave huge puddles or trails between the pieces. With "breakaway" molds, be really careful not to overfill or they will shatter when you try to break them apart.
- While you wait for the candy to set, clean up: fill the pan with water and let it sit a few hours - the sugar will dissolve, no scrubbing needed.
- After five or ten minutes, your candies will be set. Flip the mold over onto the foil and give it a gentle bend; if greased well, the candies should pop right out. They'll have a slight film of oil which helps keep them from sticking; wipe it away with a paper towel if you want, and store in an airtight container. To be extra sure they don't stick, toss them in a bag with a little powdered sugar - once you brush off the excess, they look like frosted glass!
BONUS — Lessons I learned along the way:
- LESSON #1 – Don't overfill the molds. If you put too much candy in "breakaway" molds, you'll end up with a slab that breaks into every shape except the one you wanted.
- LESSON #2 – Don't undergrease the molds. A film of oil wiped on with a paper towel is not enough; the candies stuck like crazy. Grease your molds well.
- LESSON #3 – Don't overheat the syrup. For true COLOR, don't heat past 300 degrees. An accurate, calibrated thermometer is critical. For clear or blue candies, or truly golden-free colors, you might stop a little shy of 300 (295 or 290), but you run the risk of it not setting hard enough. Colors like red/orange/yellow are more forgiving of a little caramelization.
- LESSON #4 – Have enough molds ready. Nothing more frustrating than leftover syrup with nowhere to put it. Prep all your molds.
- LESSON #5 – Don't leave the syrup in the pan. Dump it into another container when it reaches temperature, or the hot pan will keep cooking it past the target and it will turn yellow.
- LESSON #6 – Don't give up! Mistakes happen. Temperature is the most important factor. Keep at it and you'll get there!