
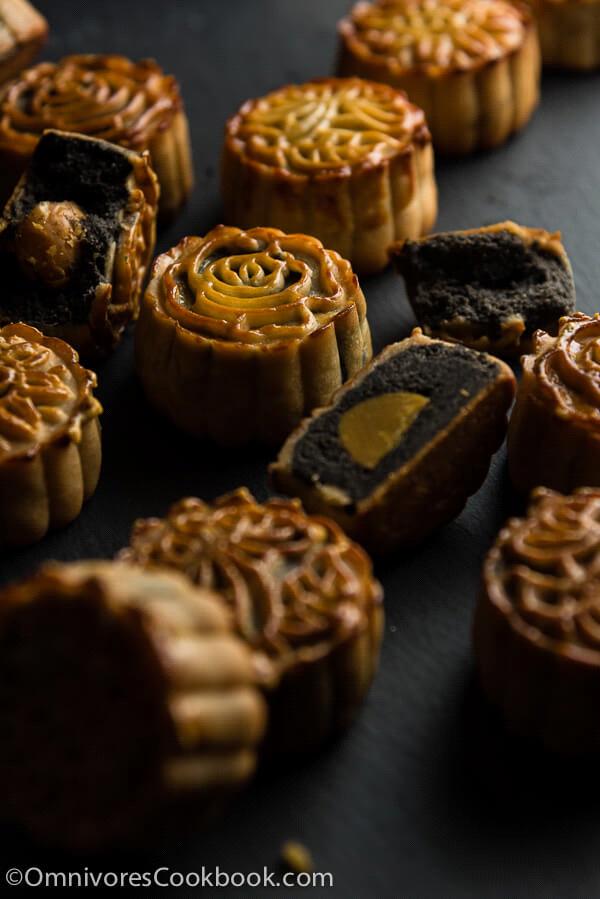
Traditional Mooncake (The Ultimate Guide, 传统广式月饼)
The ultimate guide to traditional Cantonese mooncakes with black sesame filling and salty duck egg yolks. Rated 4.9 from 15 reviews. The mooncake dough is made from golden syrup and kansui (lye water).
Ingredients
| 1 cup (140 g) | raw black sesame seeds (filling) | |
| 1/3 cup (45 g) | confectioners sugar (filling) | |
| 1/4 cup (55 g) | unsalted butter (filling) | |
| 1/4 cup (40 g) | glutinous rice flour (filling) | |
| 5 | salty duck egg yolks, halved (about 14 g per yolk) | |
| 56 g | homemade golden syrup (or store-bought) | |
| 1/2 tsp | 2.5 ml | homemade kansui (or store-bought) |
| 20 g | peanut oil (or vegetable oil without strong flavor) | |
| 1/8 tsp | 0.6 ml | salt (plus a pinch for the egg wash) |
| 100 g | cake flour (plus extra to dust) | |
| 1 | large egg yolk (or a whole egg), for egg wash |
Instructions
The difficulties If you've ever checked a traditional mooncake recipe, you might have thought, what the hell are these ingredients? The truth is, among the four ingredients in mooncake dough, there are two – golden syrup and kansui – that you might have never heard of, and they can be difficult to acquire.
Golden syrup is also called inverted sugar syrup. It is an amber-colored syrup made from sugar, but has a much richer texture and a deep aroma than a simple syrup. It also contains acid, which is a requirement for mooncake making.
Kansui, jian sui in Chinese (枧水) or lye water, is an alkaline solution made from sodium carbonate and potassium carbonate. It is often used in Asian pastries and ramen noodles. It adds a yellow color to dough (like making egg noodles without egg). It acts a bit like baking soda, as it keeps the dough fluffy and moist, but without introducing too much gas. It also neutralizes the acid in the golden syrup, so the dough won't taste sour.
Most recipes suggest you purchase golden syrup online and purchase kansui in an Asian store. However, golden syrup is quite pricey and kansui is only available at large Asian markets. On the other hand, these two ingredients are very cheap and easy to acquire in China, so there is very limited literature on how to make them at home and how to use them in mooncake recipes.
Mooncakes require very accurate measurements, and a single small tweak will change the results significantly. Since there are different formulas of golden syrup and kansui, you could get different results than intended, even if you follow the recipe a hundred percent. During the mooncake-making process, it's important to understand the function of each ingredient and the result it yields. You need to be accurate but also stay flexible when needed.
Cooking notes
About mooncake filling: The most important thing is that it keeps its shape and doesn't collapse, so that the mooncake will maintain its delicate pattern after baking. The filling should be able to stand firm at room temperature right after being shaped into a ball, and should turn tough after chilling in the fridge. (1) You need to introduce oil with a low melting point into the filling. Lard is common in traditional mooncakes, but might yield an unpleasant flavor and is greasy. Coconut oil and butter yield similar results (only use coconut oil if the flavor combination works). (2) You need to add a certain amount of solid content so the dough can stand firm even at room temperature — flour, bean paste, cornstarch, etc. Too much and the filling starts to taste like dough. Glutinous rice flour works great and helps the filling stick to itself. If making a red bean or lotus seed filling (any filling that contains water), you can also cook the paste on the stove to reduce water content. (3) You still need to add oil to the filling, even if the filling is tough by itself — otherwise it will be crumbly and fall apart. Traditional Cantonese mooncakes must be served 1 to 3 days after baking, because the skin is very tough and crumbly right after baking. As they rest, the oil seeps out and infuses the outer dough, making it soft and moist.
About mooncake dough: (1) Both all-purpose flour and cake flour work well. Traditional Cantonese mooncakes use cake flour, which yields a very tender dough (easy to work with, but slightly sticky) and a beautiful pattern after baking. (2) The single thing that matters most is the ratio of golden syrup to kansui. The golden syrup creates a tender, moist cake that keeps its shape though paper thin. Kansui neutralizes the acid, so the pastry has no sourness. The amount of kansui also determines tenderness and color: light yellow if too little, dark brown if too much. (3) You can use homemade or store-bought golden syrup; the acid content will not be the same, which affects the amount of kansui needed. (4) You can use homemade or store-bought kansui. To make kansui at home you only need baking soda and water. (5) Since the ratio of kansui to golden syrup is fixed, don't change their quantities. If the dough is too soft or too tough, only add oil or flour to adjust. (6) Keep the mooncake skin thin, really thin, otherwise the pattern won't come out clear and the bottom will be fat. (7) You don't need to fill the whole mold. For mini mooncakes with a plastic mold kit, a 50-55 gram cake is easy to shape (about 2.5 tbsp filling plus 2 tsp dough). (8) Egg wash: favorite way is egg yolk with a pinch of salt — thick, a bit hard to apply, but yields an even, beautiful golden color. Or beat a whole egg. (9) Baking temperature: anywhere from 350 to 390 F (176 to 200 C) works; favorite for mini mooncakes is 360 F (180 C). (10) Baking has two phases. First phase ~8 to 10 minutes: the mooncake takes shape and the dough hardens; edges start to turn golden. Apply egg wash only after the surface hardens (too early ruins the pattern). Second phase: return to oven and bake until the surface turns dark golden, another 8 to 11 minutes. (11) Let the mooncakes rest 24 to 72 hours. They are flaky and crumbly right after baking, turn hard as they cool, and become soft and moist again after 2-3 days as the oil seeps out (this process is known as hui you – 回油).
About the tools: You need a scale (a pocket scale with 0.1 g increments is ideal, since Chinese recipes measure by the gram). You need a brush (a large silicone brush for egg wash, plus a small pointed brush to clean the gaps). A cookie scoop saves a lot of trouble (small holds 2 tsp, medium holds 1.5 tbsp).
Prep Time: 40 mins — Cook Time: 1 hour 20 mins — Yield: 10 mini mooncakes. Category: Dessert. Cuisine: Chinese. The mooncake dough is adapted from another source.
To make mooncake filling
- Spread black sesame seeds in a large skillet and turn to medium heat. When hot, turn to medium low. Stir every 3 to 4 minutes. Cook until you smell a strong nutty aroma and hear the seeds sizzling. Transfer to a plate to cool.
- When cool, transfer to a food processor. Blend until the seeds seep oil and thicken, about 2 minutes. Scrape the paste from the walls and bottom. Blend again until a fine paste forms, about 1 minute. Scrape again.
- Add confectioners sugar and butter. Blend until fully mixed. Transfer to a bowl.
- Add glutinous rice flour. Fold with a spatula until fully blended and the paste forms a dough. If it can't be lifted by hand and is still runny, blend in more rice flour.
- Divide the sesame paste into 10 parts, about 1.5 tbsp (20 to 30 g) per portion. Shape each into a small ball.
- To shape the filling, flatten one black sesame ball with the hands. Place half a duck egg yolk in the middle. Wrap the sesame paste until it fully covers the yolk. Roll to shape a ball; it should be slightly smaller than the mooncake mold opening.
- Place mooncake filling in the fridge to cool. Wait until the balls harden.
To make mooncake dough 8. Combine golden syrup and kansui in a large bowl. Mix with a spatula until emulsified (footnote 3). 9. Add peanut oil (or vegetable oil) and mix again until evenly blended. They will still appear separated, but mix as evenly as possible. 10. Sift cake flour into the bowl. Gently fold the dough scraping from bottom to top, like folding a cake dough. Do not stir in a circular motion — it toughens the dough. 11. When the flour is fully combined, shape into a ball. The dough should be soft and a bit sticky but hold its shape. Slowly add more flour if too hard to handle. Gently knead a few times (footnote 4) with a folding motion. Seal with plastic wrap. Rest 30 minutes. 12. Gently knead a few more times and place back in the plastic wrap. Rest another 20 to 30 minutes. Then the dough is ready (footnote 5).
To assemble mooncakes 13. Work one at a time. Scoop 2 tsp dough and place between two pieces of parchment. Press into a flat disc. Roll into a small round sheet, making the middle thinner than the edges if possible. 14. Place the black sesame ball in the center of the dough sheet. Carefully wrap the dough around the filling, sealing it in completely in a thin, even layer. If some spots are too thick, pull off dough and smooth the surface. It doesn't matter if the dough is so thin it reveals the color of the filling. 15. Dust both hands and the dough with a bit of cake flour. Roll the dough between hands so the surface is dusted evenly. 16. Slide the plastic pattern disc into the mooncake mold, pattern side down. Sometimes twist the handle a bit to make the disc slide to the end. 17. Carefully place the mooncake into the mold. If difficult without scraping off dough, gently roll the mooncake to fit. 18. Place the mold on the parchment and press the handle until you cannot move it further. Pull the handle up and release the mooncake. 19. Carefully hold the mooncake without squeezing, and remove the pattern disc. 20. If you cannot shape a clear pattern, wrap all the mooncakes first and shape into balls. Place onto a large baking tray and seal with plastic wrap. Chill 10 to 20 minutes until the dough hardens a bit (do not chill too long).
To cook mooncakes 21. Preheat oven to 360 degrees F (180 C). 22. Place mooncakes on a big metal baking tray, 1 inch (2 cm) apart. Spray a thin layer of water onto the mooncakes to prevent cracking. 23. Beat the egg yolk with a pinch of salt in a small bowl. 24. Bake on the middle rack for 8 to 9 minutes, until the dough toughens and the edges start to turn golden. 25. Remove from oven. Brush a thin layer of egg wash on the top surfaces only, not the vertical surfaces. If you brush too much and it fills the pattern, use a small brush to clean the gaps. 26. Place back in the oven and bake until the egg wash turns golden brown, about 8 minutes. 27. Let mooncakes cool in the tray before removing (footnote 6). Use a spatula to gently push them off the tray. Transfer to a plate to cool completely. 28. Store in an airtight container. Can be served after 24 hours; they look and taste better after 3 days.
NOTES
- To make black sesame mooncakes without egg yolk, double the black sesame filling and you'll make 10 mini mooncakes.
- Egg yolk with salt yields prettier mooncakes with a nice aroma, but is thick and a bit hard to brush; use a whole egg alternatively, or add egg white to dilute.
- With store-bought golden syrup you might not get an emulsified mixture due to lower acid ratio.
- Do not knead the dough on a wooden board or working surface — it will stick.
- If the black sesame filling hasn't toughened, keep the dough wrapped until ready to assemble. It's OK to rest another hour or two on the countertop, but not half a day or overnight (it becomes tough).
- The mooncakes will be flaky and soft when hot. If you remove them right after baking, you will crush them.